

Want to quickly get started making an API app that needs a user authentication piece? Let’s take a look at how to do that with FastAPI and Google Firebase in this tutorial. FastAPI is a new Python framework to facilitate the creation of APIs. Google Firebase Authentication is Google Cloud Platform’s authentication tool. It’s similar to tools like AWS Cognito, Azure Active Directory, or Okta.
In this post, we’re going to go over how to integrate Firebase Auth with FastAPI. We’ll cover:
- What is the Python FastAPI Framework?
- Python Packages you need to run FastAPI Apps Locally
- What is Google Firebase Authentication?
- How Does Google Firebase Auth Work?
- Setting up Firebase Authentication
- Setting Up Our FastAPI App to Connect with Google Firebase Auth
- Creating the FastAPI Signup Endpoint for Google Auth
- Creating the FastAPI Login Endpoint for Google Authentication
- Dummy Endpoint to Validate Firebase Authentication Worked
- Run Your FastAPI App Locally with Uvicorn
- Testing Signup with Firebase Authentication via Firebase Admin
- Testing Login from Firebase Auth via Pyrebase
- Validating JWT with Firebase Admin
- Summary of Using Google Firebase Auth with FastAPI Python Backend
An Introduction to the Python FastAPI Framework
FastAPI is a Python framework designed specifically for building APIs. It’s built on Starlette and Pydantic. Starlette is the base for the web pieces and Pydantic is the base for the data pieces. FastAPI is compatible with all versions of Python 3.6 and above. For this example, we’ll be using Python 3.10.
Python Packages to Run FastAPI Apps Locally
To run an app built on FastAPI locally, we will also need an asynchronous server gateway interface (ASGI), and we’ll use uvicorn as suggested in the docs. To get the packages you’ll need to build a basic FastAPI app, run pip install fastapi uvicorn in your terminal.
What is Google Firebase Authentication?
In 2008, Google launched their App Engine. In 2010, they launched their cloud storage. Firebase was founded in 2012 and in 2014, Google acquired Firebase and announced Firebase Auth and Firebase Hosting. Google Firebase Authentication is the user management solution part of Google Cloud Platform. You need a Google Cloud Platform account for it.
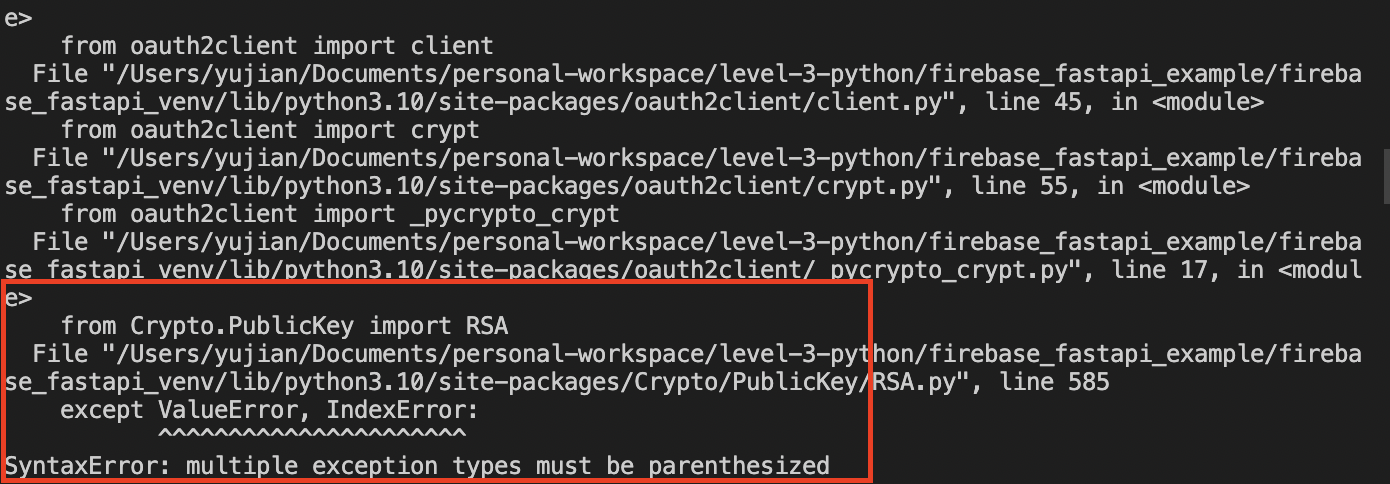
To install the Google Firebase SDK and the Python wrapper to work with it, run pip install pyrebase4 firebase-admin. It is very important that you install pyrebase4 and not pyrebase which will install pyrebase 3. You will get a SyntaxError in the RSA.py file if you use pyrebase 3.

How Does Google Firebase Auth Work?
Google Firebase Authentication fully manages users for you. It allows you to easily add sign in methods from the basic email/phone configuration to single-sign-ons. Currently, it supports Google, Facebook, Apple, Microsoft, Twitter, and many more. It also provides an easy way to implement email verification and idempotency, and track usage.
Like other managed user solutions, Google Firebase Auth uses JSON Web Tokens (JWT) to verify identity. When you create a user, Firebase Auth populates a user with a unique ID in your managed user database. It then sends that ID back, it’s up to you if you want to populate your own user database with that ID or not.
If you are running an application where you want to customize user access, then you will need your own user database. Once a user is created, they can now log in with the login methods that they signed up with. When a user logs in, Firebase Auth will verify their ID and then return a JWT token.
Once you have a JWT token, your user is “logged in”. There are many ways to verify if your user is logged in with the right JWT token. The most common solutions include sending your JWT token in the header (which we’ll do here), sending your user id in the header or body, or simply using a “logged in” flag on the front end. The reason we’ll be sending the JWT token in the header and decoding it on the server side is because it’s safer than sending unencoded messages directly through your request.
Setting up Firebase Authentication
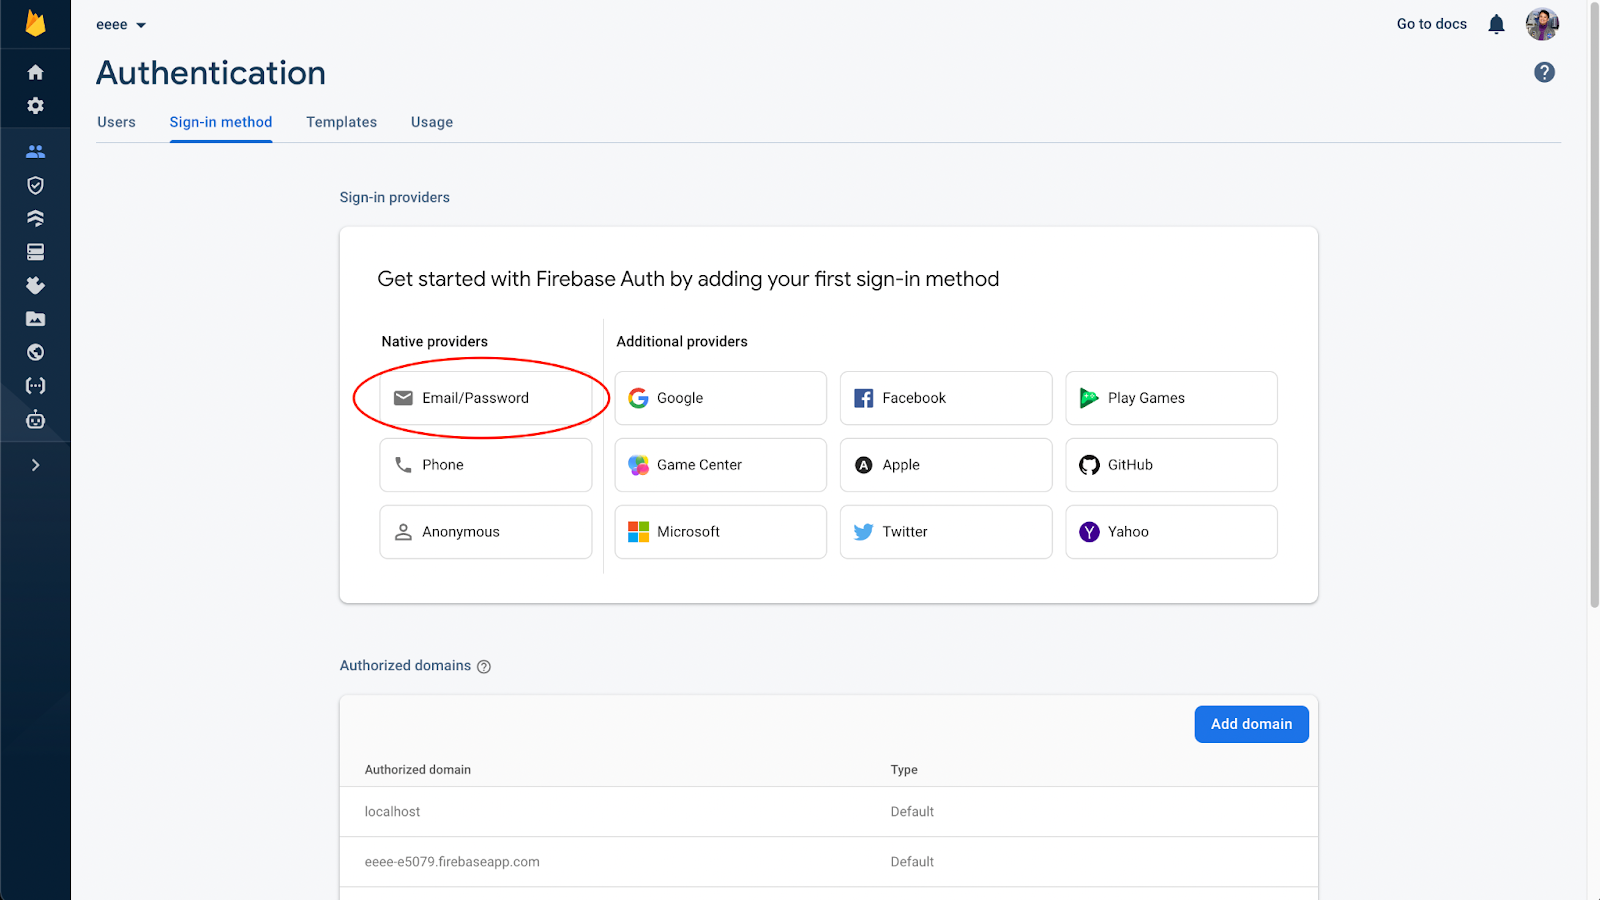
To set up Firebase Authentication, we first need to sign up for Google Firebase. Once you sign up for a Firebase account, you will need to create a Project. Click into your project and you should see a sidebar, look for a person icon (circled in red in the image below). The authentication page will look like the image below (as of Jun 18, 2022).


Once you click “Get started”, it’ll take you to a page to set up your sign-in methods. The easiest one to get started with is the Email/Password option. Setting up Google auth is also simple.
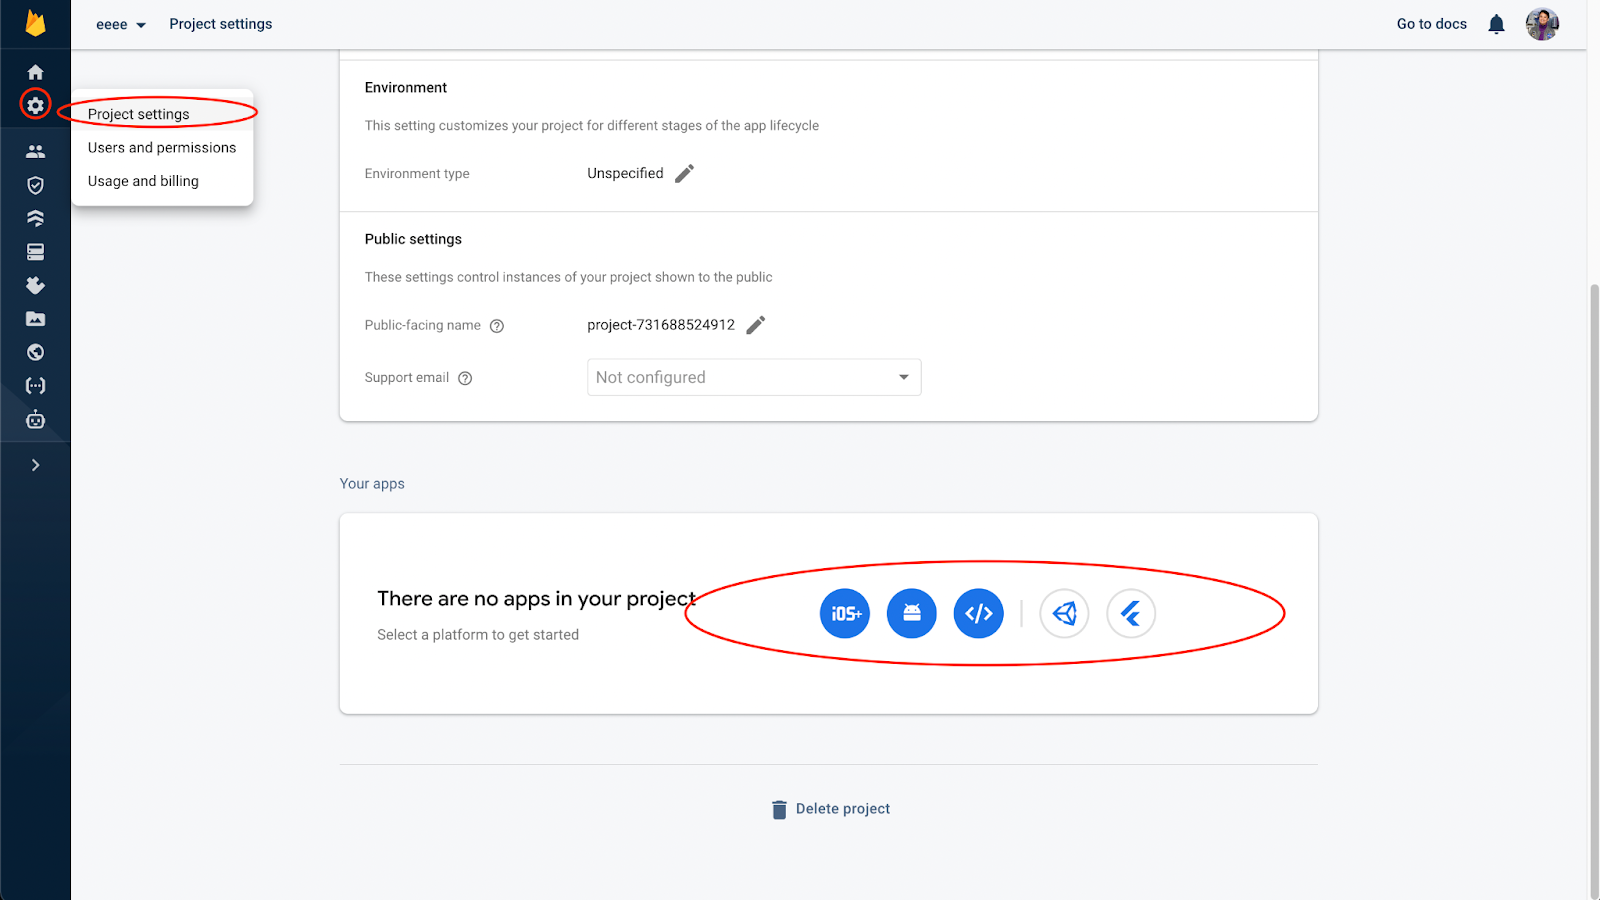
Once you’ve set up your Firebase Authentication using an email and password, you want to go to your project settings and scroll all the way down under the “General” tab. You will see the apps in your project. Pick whichever app you’re working on, iOS, Android, Web, Unity, or Flutter. For this project, we’re going to create a webapp.
The wizard will ask you to name your app. After you name your app, it will ask you if you want to use npm or <script> tags to use the SDK. You can ignore this. Once you’re out of the app creation wizard, go back to project settings and scroll down again. You should now see an image like the one below. Copy the config below and save it as firebase_config.json. You will also need to add a line that says ”databaseURL”: “” because the Python SDK looks for it.

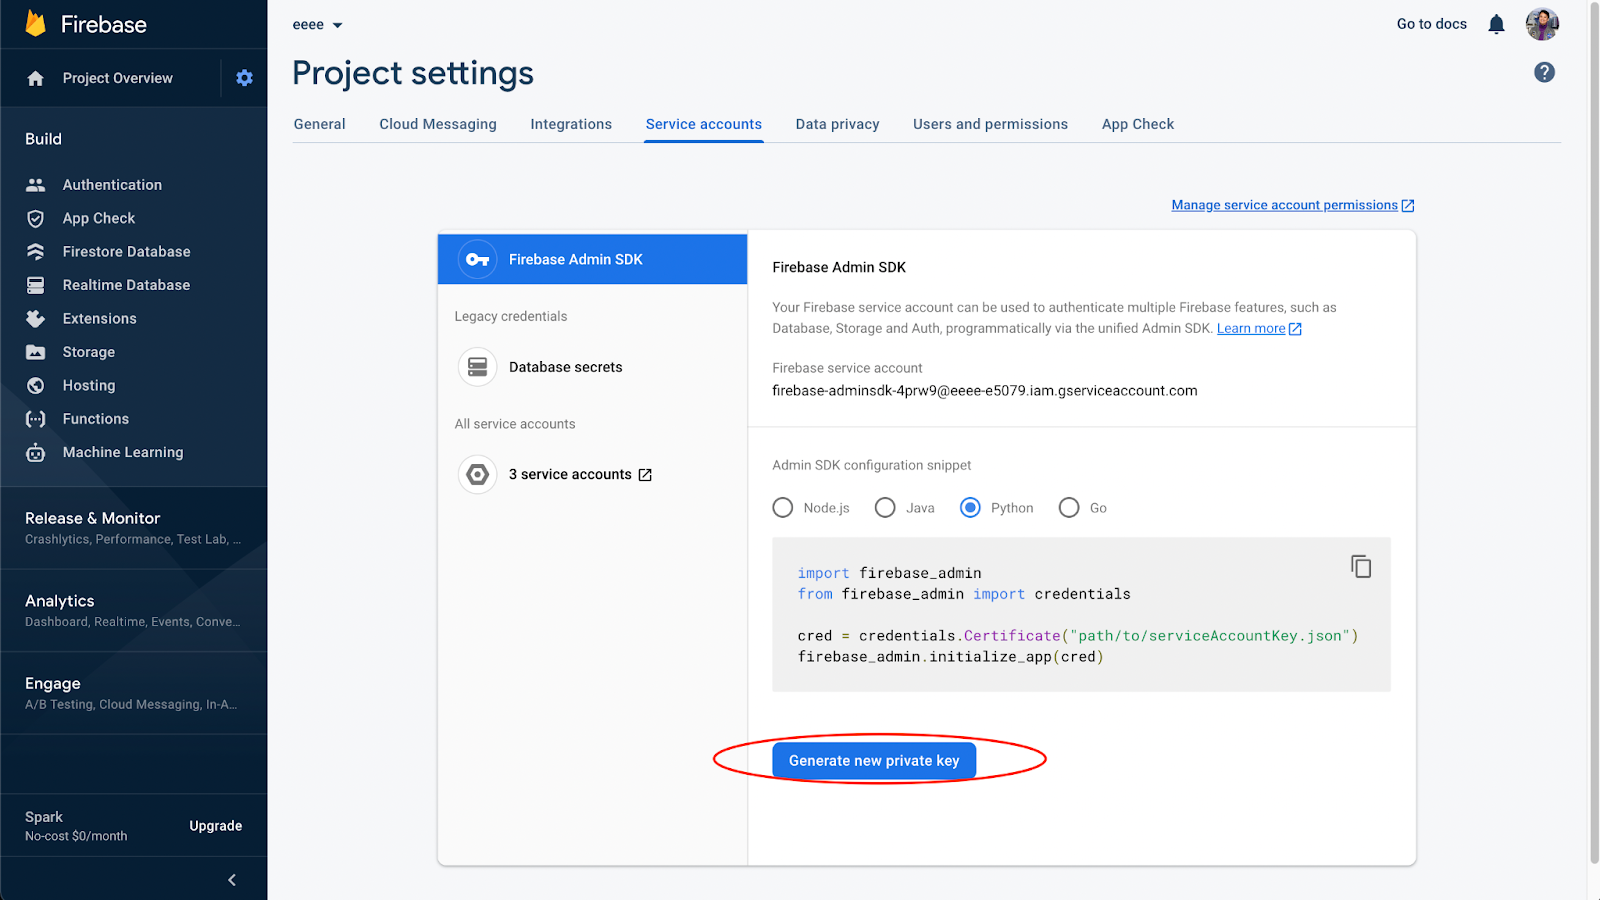
Once you have this file saved locally, scroll back up the page and go to the “Service accounts” tab. Choose Python to see the example code to load your credentials. Click “Generate new private key” to get your admin keys. Save this file locally as <project-name>_service_account_keys.json and move it into your project root directory.
Setting Up Our FastAPI App to Connect with Google Firebase Auth
Before we get into building out our signup and login endpoints, we need to set up FastAPI and our Firebase connection. We will be using uvicorn to create our server, firebase_admin and pyrebase connect to Firebase and use its authentication service, json to read JSON objects, and finally FastAPI to build our API endpoints. This will all be in one file called main.py.
import uvicorn
import firebase_admin
import pyrebase
import json

from firebase_admin import credentials, auth
from fastapi import FastAPI, Request
from fastapi.middleware.cors import CORSMiddleware
from fastapi.responses import JSONResponse
from fastapi.exceptions import HTTPException
After our imports, the first thing we want to do is create our Firebase connection. Use the service account keys that you downloaded earlier to create a credentials.Certificate for Firebase. Then, use those credentials to initialize the firebase_admin app. Next, we’ll use pyrebase to initialize a Firebase app based on the Config file we downloaded above.
The difference between these two Firebase setups is what they do. The firebase_admin app will verify the ID token for the user while the pyrebase app is the one that lets you sign in with your email and password.
Now that we’ve set up our Firebase Authentication services, let’s set up our FastAPI app. It’s pretty simple, we just call FastAPI() to set up our app. We are also going to add middleware to our app that allows cross origin resource sharing (CORS). We’ll set it up so that we can hit our API from anywhere. Note that in production, you will want to limit how your API is called!
Finally, we’ll run the app on uvicorn in our main function.
cred = credentials.Certificate('eeee_service_account_keys.json')
firebase = firebase_admin.initialize_app(cred)
pb = pyrebase.initialize_app(json.load(open('firebase_config.json')))
app = FastAPI()
allow_all = ['*']
app.add_middleware(
   CORSMiddleware,
   allow_origins=allow_all,
   allow_credentials=True,
   allow_methods=allow_all,
   allow_headers=allow_all
)

# signup endpoint

# login endpoint

# ping endpoint

if __name__ == "__main__":
   uvicorn.run("main:app")
FastAPI Signup Endpoint for Google Auth


Now let’s create the signup endpoint. This is the endpoint that we will hit to create a new user account in Firebase. To create a new user account, we will need to get an email and password from the user. This information should be passed through the request body as a JSON.
As with many modern Python frameworks, FastAPI uses decorators. We will use the FastAPI decorator to declare a way to send a POST request to the /signup endpoint. I’ve also opted to not include this in the schema. If you are creating an API, there’s a good chance you don’t want to expose this in your API schema. If you are creating a webapp, this is less applicable.
FastAPI uses async functionality, so we will be creating an asynchronous function. The only parameter that we need to pass our function is the HTTP request being sent. The first thing we’re going to do in our function is await the JSON of the request. Then, we’ll extract the email and password out and verify that they are both there or return an Exception.
Next, we’ll use the auth functionality from firebase_admin to create a new user with Firebase authentication. All we need to create a new user is the email and password, and the reason we can do this is because we set that up as an approved user type in the Firebase Authentication console earlier.
If the user is created successfully, we return a success message and the new user ID. You can store this ID in your personal user database. If the user is not created successfully, such as if someone re-uses an email, then we return an error message.
# signup endpoint
@app.post("/signup", include_in_schema=False)
async def signup(request: Request):
   req = await request.json()
   email = req['email']
   password = req['password']
   if email is None or password is None:
       return HTTPException(detail={'message': 'Error! Missing Email or Password'}, status_code=400)
   try:
       user = auth.create_user(
           email=email,
           password=password
       )
       return JSONResponse(content={'message': f'Successfully created user {user.uid}'}, status_code=200)
   except:
       return HTTPException(detail={'message': 'Error Creating User'}, status_code=400)
FastAPI Login Endpoint for Google Firebase Auth

Just like our signup endpoint, our login endpoint will be a POST endpoint. The function will also only need to take the request as a parameter. Once again, we’ll await the loading of the JSON of the request. Then, we’ll extract the email and password from the JSON and try to authenticate the user using the pyrebase instance we created earlier. If successful, we return the JSON Web Token, otherwise we return an Exception.
@app.post("/login", include_in_schema=False)
async def login(request: Request):
   req_json = await request.json()
   email = req_json['email']
   password = req_json['password']
   try:
       user = pb.auth().sign_in_with_email_and_password(email, password)
       jwt = user['idToken']
       return JSONResponse(content={'token': jwt}, status_code=200)
   except:
       return HTTPException(detail={'message': 'There was an error logging in'}, status_code=400)
Dummy Endpoint to Validate Firebase Authentication

Now that we’ve handled the login and signup code, let’s create a dummy endpoint to validate the token. I will call this endpoint ping, but you can call it whatever you want. It is going to expect to see the JWT in the authorization field of the request headers.
Technically, you can send the JWT through the request any way you want, but it is typically sent through the headers because it is used for validation. The advantage of sending it through the headers and not the JSON body is that we don’t have to await anything to load before running validation.
This example validation function will print out the JWT to the console. Then, it will call the auth module from firebase_admin to verify the JWT and return the user ID. If it can’t verify the token, there will be an error thrown. Technically we can throw it here, but I’ve opted to let the server do it.
# ping endpoint
@app.post("/ping", include_in_schema=False)
async def validate(request: Request):
   headers = request.headers
   jwt = headers.get('authorization')
   print(f"jwt:{jwt}")
   user = auth.verify_id_token(jwt)
   return user["uid"]
Run Your FastAPI App Locally with Uvicorn
To get your FastAPI App up and running locally just run uvicorn --port 1234 main:app --reload in the terminal. You can adjust the port to fit your usage, the default port is 8000 and the default host is your localhost, http://127.0.0.1.
While the app is running, the terminal will show a reload process that looks like the image below. It will also display the host and port that Uvicorn is running on.


Testing Signup with Firebase Authentication and Pyrebase
Now let’s create a test program to test the Firebase signup endpoint we made. This is a separate file that I’ve called test_signup.py. This is not a traditional unit test. The first thing we’ll do is import the requests library. Then, we’ll create a signup function that takes an email and a password.
This function will take the email and password and form them into a JSON body to send to the POST endpoint. Then, we’ll use the requests library to send a POST request to the signup endpoint with the dictionary we created above as our JSON body. Finally, the function will return the text. We’ll call this function with an email and password and print out the response.
import requests

def signup(email: str, password: str):
   body = {
       "email": email,
       "password": password
   }
   response = requests.post(url="http://127.0.0.1:9001/signup", json=body)
   return response.text

print(signup("abcd@abcd.com", "password"))
The image below shows a response similar to the one you should get if you run the file above while the Uvicorn server is still running the FastAPI app we made earlier. The function returns a message that shows you the newly created User ID. You can save this ID in your custom user database if you’re using one.


Testing Login with Firebase Auth Pyrebase and FastAPI
Okay, now that we’ve created a user, let’s also test login. For this file, separate from the signup test one, we’ll start by importing requests and json. Our login function will take an email and password just like the signup function. We will also create the same JSON body. Then, we need to send a post request to the login endpoint. In this case, we’ll return just the token by extracting out the token from the response text using the JSON library.
import requests
import json

def login(email: str, password: str):
   body = {
       "email": email,
       "password": password
   }
   response = requests.post(url="http://127.0.0.1:9001/login", json=body)
   return json.loads(response.text)["token"]

print(login("abcd@abcd.com", "password"))
The image below shows what an example response would look like. The JWT will be a long string.


Using the Ping Endpoint for JWT Validation with Firebase Auth and Pyrebase
In the same file as the login function is defined above, we’ll create a function to test the JWT returned. Instead of printing the login result, I store it in a variable called token. The ping function will take the token as a parameter.
In the function, we’ll create a header with an authorization key that corresponds to the token. Then, we’ll send off a POST request to the ping URL with the headers and print the response.
token = login("abcd@abcd.com", "password")

def ping(token: str):
   headers = {
       'authorization': token
   }
   response = requests.post(url="http://127.0.0.1:9001/ping", headers=headers)
   return(response.text)

print(ping(token))
We should expect to see a response like the one below which shows us the user ID we created earlier.


Summary of Using Google Firebase Auth with FastAPI Python Backend
In this post we covered the basics of the FastAPI package and Google Firebase Authentication. We covered the packages we need to run a FastAPI app locally, and the packages we need to interact with Google Firebase Authentication in Python.
We built a one-file FastAPI app with three endpoints: signup, login, and ping. These endpoints create a user, log a user in, and verify the JWT token returned from a login. Then we created test scripts to run while the FastAPI app was running locally on Uvicorn and tested our endpoints.
Further Reading
- Python Dotenv for Environment Variable Management
- Python List within List Guide
- Named Entity Recognition (NER) in Python
- AI Text Summarizer with Python
- Generate 4×4 Magic Square in Python
I run this site to help you and others like you find cool projects and practice software skills. If this is helpful for you and you enjoy your ad free site, please help fund this site by donating below! If you can’t donate right now, please think of us next time.

