

In December of 2021, we went over How to Build a Recurrent Neural Network from Scratch, How to Build a Neural Network from Scratch in Python 3, and How to Build a Neural Network with Sci-Kit Learn. As a continuation in the Neural Network series, this post is going to go over how to build a simple LSTM model in Keras with Tensorflow.
In this post we’ll use Keras and Tensorflow to create a simple LSTM model, and train and test it on the MNIST dataset. Here are the steps we’ll go through:
- What is an LSTM?
- Creating a Simple LSTM Neural Network with Keras
- Importing the Right Modules
- Adding Layers to Your Keras LSTM Model
- Training and Testing our LSTM on the MNIST Dataset
- Load the MNIST dataset
- Compile the Keras LSTM model
- Train and Fit the Keras LSTM Model
- Test your Keras LSTM Model
- Summary of Building a Keras LSTM Module in Python
To follow along, you’ll need to install tensorflow which you can do using the line in the terminal below.
pip install tensorflow What is an LSTM?


LSTM stands for “Long Short-Term Memory”. Confusing wording right? An LSTM is actually a kind of RNN architecture. It is, theoretically, a more “sophisticated” Recurrent Neural Network. Instead of just having recurrence, it also has “gates” that regulate information flow through the unit as shown in the image. LSTMs were initially introduced to solve the vanishing gradient problem of RNNs. They are often used over traditional, “simple” recurrent neural networks because they are also more computationally efficient.
Creating a Simple LSTM with Keras
Using Keras and Tensorflow makes building neural networks much easier to build. It’s much easier to build neural networks with these libraries than from scratch. The best reason to build a neural network from scratch is to understand how neural networks work. In practical situations, using a library like Tensorflow is the best approach. It’s straightforward and simple to build a neural network with Tensorflow and Keras, let’s take a look at how to use Keras to build our LSTM.
Importing the Right Modules
The first thing we need to do is import the right modules. For this example, we’re going to be working with tensorflow. We don’t technically need to do the bottom two imports, but they save us time when writing so when we add layers we don’t need to type tf.keras.layers. but can rather just write layers.
import tensorflow as tf
from tensorflow import keras
from tensorflow.keras import layers
Adding Layers to Your Keras LSTM Model
It’s quite easy to build an LSTM in Keras. All that’s really required for an LSTM neural network is that it has to have LSTM cells or at least one LSTM layer. If we add different types of layers and cells, we can still call our neural network an LSTM, but it would be more accurate to give it a mixed name.
To build an LSTM, the first thing we’re going to do is initialize a Sequential model. Afterwards, we’ll add an LSTM layer. This is what makes this an LSTM neural network. Then we’ll add a batch normalization layer and a dense (fully connected) output layer. Next, we’ll print it out to get an idea of what it looks like.
model = keras.Sequential()
model.add(layers.LSTM(64, input_shape=(None, 28)))
model.add(layers.BatchNormalization())
model.add(layers.Dense(10))
print(model.summary())
You’ll see that the LSTM actually has WAY more parameters than the Simple RNN we built with Keras. The LSTM layer has four times the number of parameters as a simple RNN layer. This is because of the gates we talked about earlier.


Training and Testing our Keras LSTM on the MNIST Dataset
Now that we’ve built our LSTM let’s see how it does on the MNIST digit dataset. This is the same dataset we tested the Keras RNN and the built from scratch Neural Network on. The MNIST dataset is a classic dataset to train and test neural networks on. It is a set of handwritten digits.
Load the MNIST dataset
The first thing we’ll do is load up the MNIST dataset from Keras. We’ll use the `load_data()` function from the MNIST dataset to load a pre-separated training and testing dataset. After loading the datasets, we’ll normalize our training data by dividing by 255. This is due to the scale of 256 (0 to 255) for the image data. Finally, we’ll set aside 10 test data points.
mnist = keras.datasets.mnist
(x_train, y_train), (x_test, y_test) = mnist.load_data()
x_train, x_test = x_train/255.0, x_test/255.0
x_validate, y_validate = x_test[:-10], y_test[:-10]
x_test, y_test = x_test[-10:], y_test[-10:]
Compile the LSTM Neural Network
Now that we’ve created our LSTM and loaded up our data, let’s compile our model. We have to compile (or build) or model before we can train or test it. In our model compilation we will specify the loss function, in this case Sparse Categorical Cross Entropy, our optimizer, stochastic gradient descent, and our metric(s), accuracy. We can specify multiple metrics, but we’ll just go with accuracy for this example.
model.compile(
    loss=keras.losses.SparseCategoricalCrossentropy(from_logits=True),
    optimizer="sgd",
    metrics=["accuracy"],
)
Train and Fit the Keras LSTM Model
Now that the model is compiled, let’s train the model. To train the model in Keras, we just call the fit function. To use the fit function, we’ll need to pass in the training data for x and y, the validation, the batch_size, and the epochs. For this example, we’ll just train for 10 epochs.
model.fit(
    x_train, y_train, validation_data=(x_test, y_test), batch_size=64, epochs=1
)model.fit(
    x_train, y_train, validation_data=(x_validate, y_validate), batch_size=64, epochs=10
)
Test the Long Short Term Memory Keras Model
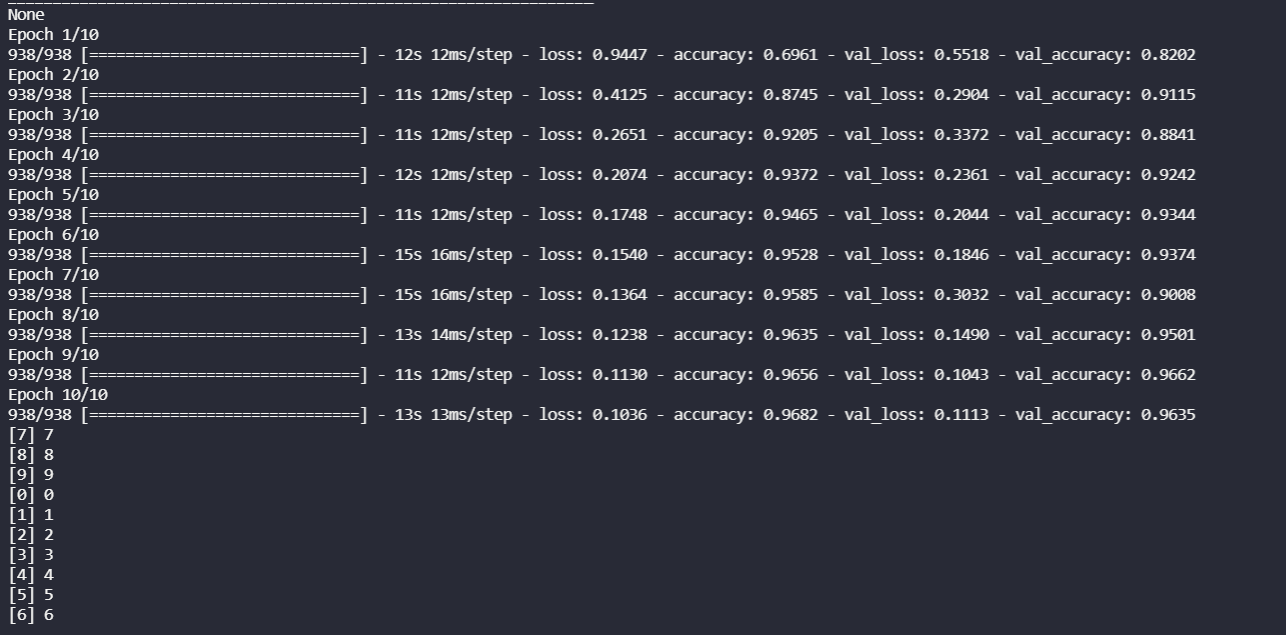
We’ve already trained and fit the model. The last thing to do is to test the model. We’ll run our model and use it to predict the sample we set aside earlier. Then, we’ll print out the sample and the correct label.
for i in range(10):
    result = tf.argmax(model.predict(tf.expand_dims(x_test[i], 0)), axis=1)
    print(result.numpy(), y_test[i])
We can see that after 1 epoch (you should really train for more, but once again this is just for an example)
We can see that after 10 epochs we see a pretty good accuracy at about 96%.

Build a Simple LSTM with Keras Summary
In this post we learned how to build, train, and test an LSTM model built using Keras. We also learned that an LSTM is just a fancy RNN with gates. We built a simple sequential LSTM with three layers. Finally, we tested the LSTM we built on the MNIST digits dataset, a cornerstone dataset to test neural networks on.
Further Reading
- Slicing Python Strings
- Build an AI Text Summarizer
- Build an AI Content Moderation System
- Send API Requests Asynchronously in Python
- A Comprehensive Guide to the Python Random Library
I run this site to help you and others like you find cool projects and practice software skills. If this is helpful for you and you enjoy your ad free site, please help fund this site by donating below! If you can’t donate right now, please think of us next time.

