
I am pretty sure I’ve had to look up how to work with strings over 100,000 times now. Not just in Python, but for programming in general. Strings are not treated the same in each programming language though. For example, you have to use pointers to mess with strings in C. However, Python provides a lot of versatility and functionality with strings. In this post we’re going to cover many of the things that I’ve had to look up often enough to be annoyed.
If you want to learn about strings in R, check out this article on Concatenating and Splitting Strings in R by the amazing Kristen Kehrer from Comet ML. Sign up for a Comet ML Account to improve your ML Model Monitoring.
We cover:
- Convert a Python String to Bytes
- “TypeError: ‘str’ does not support the buffer interface” Note
- Bytes to String with Python Decode Function
- Python
ljustfunction for Left Justification - String Indexing in Python (CharAt Java Equivalent)
- What is the First Negative Index in a Python String?
- Python String Copy Details
- Python Copy String into a Shallow or Deep Copy Overview
- Diagram of How Python String Copy Works
- IsUpper Python Function (Equivalent to Java isUpperCase)
- IsLower Python Function (Equivalent to Java isLowerCase)
- Python Lower vs Casefold Function for Comparing Strings
- Check if a String is Alphanumeric with the isAlNum Python Function
- Summary of Python String Manipulation
Convert a Python String to Bytes
A basic programming task is to switch data types. Strings and bytes are both pretty common data types. Usually, you’ll want to switch a Python string to bytes if you want to store it. Computers don’t understand what a “string” is, but they do understand bytes.
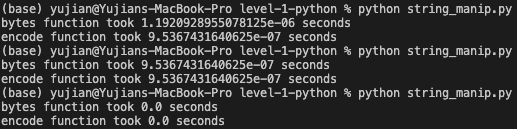
Converting a Python string to bytes has some interesting nuances. Python 3 offers two ways to do this, shown below. I’ve also included the time module so we can see how long the two different functions take. The first way to convert a Python 3 string to bytes is using the bytes data type converter, the second is to use the encode function built-in to strings.
import time

# Python string to bytes
mystring = "Solar Power"
start = time.time()
b1 = bytes(mystring, 'utf-8')
print(f"bytes function took {time.time()-start} seconds")
start = time.time()
b2 = mystring.encode('utf-8')
print(f"encode function took {time.time()-start} seconds")
Running this function multiple times shows us that the two functions take nearly identical execution times. Both near 0. What happens under the hood though? The bytes data type converter function actually calls encode under the hood for strings. In the end, this level of abstraction doesn’t really add much execution time.
The main thing to think about when considering which way you want to convert your Python string into bytes is this – which is more Pythonic? The encode function has an equivalent that we’ll see in action below. The bytes function is more flexible, so it can be used on more than just strings.
Coming from a Java background, I like the encode function a bit more. The encode function feels more or less equivalent to the Java string .getBytes function.
“TypeError: ‘str’ does not support the buffer interface” Note
This will come up if you’re switching between Python 2 and 3. In Python 2, strings were byte strings, so you could implicitly write strings as bytes. In Python 3, you have to explicitly type cast a string to bytes.
Bytes to String with Python Decode Function
As we talked about above, one of the reasons to use the encode function is because of the nice symmetries with the decode function. The way we turn bytes into a string is by calling the decode function on it as a utf-8 encoded string.
# Python bytes to string
mystring = "Solar Power"
b1 = bytes(mystring, 'utf-8')
b2 = mystring.encode('utf-8')
s1 = b1.decode("utf-8")
s2 = b2.decode("utf-8")
print(s1)
print(s2)
As we can see in the image below, decoding the resulting byte array from both strings results in the original strings. This shows that the encode and bytes function perform (basically) the same action.

Python ljust Function for Left Justification
Most strings are left aligned. This is because we read things from left to right in English. The Python ljust function puts a little twist on things. ljust makes strings left justified. A string that is left justified can (usually is) still left aligned. The difference is that we’re padding the string to the left.
Let’s take a look at how Python’s ljust string function works. The ljust function takes up to 2 parameters. One required parameter, the length of the resulting, left justified string, and one optional parameter, the padding character. If we don’t specify a padding character, Python ljust automatically uses a space.
The code below is a continuation of the file above with the same strings. We show three different ways to call ljust. First without the optional parameter, and then twice with different characters passed as the filler.
# Python ljust example
print(s1.ljust(25))
print(s1.ljust(25, "!"))
print(s2.ljust(25, "#"))
The output should look like the image below. Note that the first one is space padded so we see nothing when we print it out

However, if we change the code slightly so that it shows the representation of that string using repr we see the spaces are there.
# Python ljust example
print(repr(s1.ljust(25)))
print(s1.ljust(25, "!"))
print(s2.ljust(25, "#"))
See how the string is now in quotes in the image below with multiple spaces behind it?

String Indexing in Python (CharAt Java Equivalent)
As I said above, I come from a Java background. String indexing in Python is so easy. You can access characters in a string the same way you access entries in a list. In Java, you use the CharAt method to get the character at a specific index. In Python, you simply use brackets.
Let’s take a look at some examples of string indexing in Python on a left justified string. We call ljust on the string we’ve been using all along, Solar Power, and set that result to a new string. Then we use brackets to find the characters at each index. The example indices we’ll use are 0, 10, and 24.
# Python String Indexing
s3 = s1.ljust(25, "$")
print(s3[0])
print(s3[10])
print(s3[24])
As we can see, we got the characters in the 1st, 11th, and 25th positions as expected. If you are new to programming – remember that Python/Java/C/etc are all 0 indexed. That means index 0 is the location of the first character.

What is the First Negative Index in a Python String?
Transitioning to Python and seeing negative indices was so weird. I was like “what am I looking at?” However negative indices in Python strings are not hard. So, what is the first negative index in a Python string? It’s the last character! For a deeper dive, check out String Slicing in Python.
Using the same string as above, the ljust 25 character padded with $ characters, we can use negative indices to get the same values as we had before. Earlier, we accessed the first, 11th, and 24th element in the string.
This time we’re going to access the same string index with a negative index. The rule to access index x in a string of length m with a negative index, n, is that the absolute value of x and n have to sum to m. For example, index 0 and index -25 are the same, just like index 10 and -15 and 24 and -1. (Code from the last section is reproduced here for clarity)
# Python ljust + negative indices
s3 = s1.ljust(25, "$")
print(s3[0])
print(s3[10])
print(s3[24])

print(s3[-25])
print(s3[-15])
print(s3[-1])
The image below shows that the string indices that we’re accessing are the same with the positive and negative index values.

Python String Copy Details
Most programming languages, including Python, have two types of copying. There is “shallow” copying and “deep” copying. It’s especially important to pay attention to the type of copying you use when it comes to non-constant type objects (i.e. lists). However, it is still worth noting that this behavior is different.
Let’s cover a few basic Python behaviors before we get deeper into how each of these copies work. Python is a “pass by alias” language. Some languages use “pass by reference”, meaning that references to variables are operated on. Some languages use “pass by value”, meaning the actual value stored in a variable is operated on.
The main difference between the functional effects of passing by reference or value is how variables are used in functions. Python’s “pass by alias” works similarly to a mix of pass by reference and pass by value. Python passes around a reference to a variable that points to the value on the heap.
It’s most important to distinguish the way variables are used/passed when working with functions or variables that are traditionally used with pointers (i.e. lists). If you come from a C background you may be used to strings being pointers. However, in Python, strings are immutable objects. This means that if you change the object, it doesn’t change the object in memory, instead it creates a new object entirely. The overall gist is that it doesn’t really matter if you use a shallow or deep copy for strings.
Python Copy String into a Shallow or Deep Copy Overview
A shallow copy of an object contains references to the original objects. A deep copy does not retain the reference values, it contains copies of the original objects. The third way to do a Python string copy is to straight up use the =. Let’s look at some examples below.
We use the copy library to bring in both the copy and deepcopy functions. In the code below, we create three copies. First with an = operator, then with copy and deepcopy. Next, we show where these copies and the original are located in memory. (Check the image below the code out for expected behavior)
Next, we augment each of these strings to demonstrate a couple of things. First, changing one string doesn’t change the others no matter which copy method you use. Note that this is not the behavior that happens with mutable objects (i.e. lists). Second, as we change the objects, their locations in memory change as well. This shows that we are not changingan object so much as changing where the variable references in memory.
# python string copy example + memory alloc
import copy
s4 = s3
s5 = copy.copy(s3)
s6 = copy.deepcopy(s3)
locations = map(id, [s3, s4, s5, s6])
for loc in locations:
   print(f"Memory located at: {loc}")
s3 += "a"
s4 += "x"
s5 += "y"
s6 += "z"
print(f"String 3: {s3}")
print(f"String 4: {s4}")
print(f"String 5: {s5}")
print(f"String 6: {s6}")
locations = map(id, [s3, s4, s5, s6])
for loc in locations:
   print(f"Memory located at: {loc}")
From the picture below we can see that the strings all start out referencing the same place in memory. This is because string immutables are interned (not like the people you hire for the summer) in memory. Interning immutables like strings helps us save memory space.
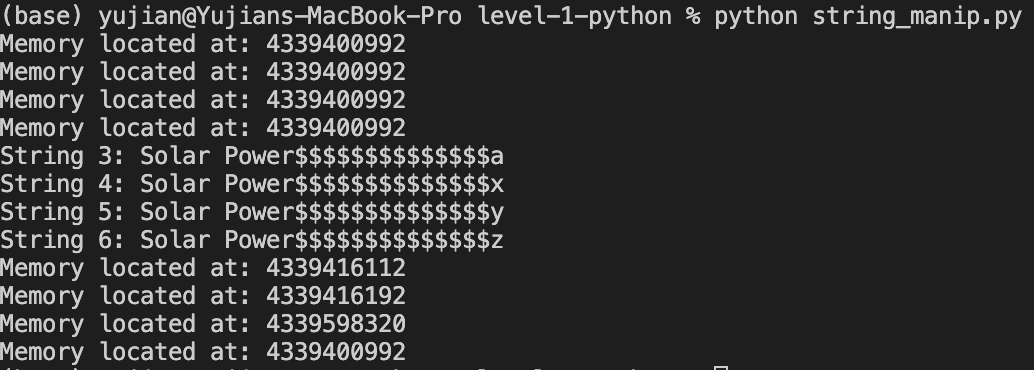
Diagram of How Python String Copy Works
We can take a look at how the string copying works underneath the hood. When we first create the copies, we can see that they all point to the same address (on the heap). Python makes efficient use of memory by storing strings in a string pool. Before it assigns memory addresses, Python checks if the string is already in the string pool.
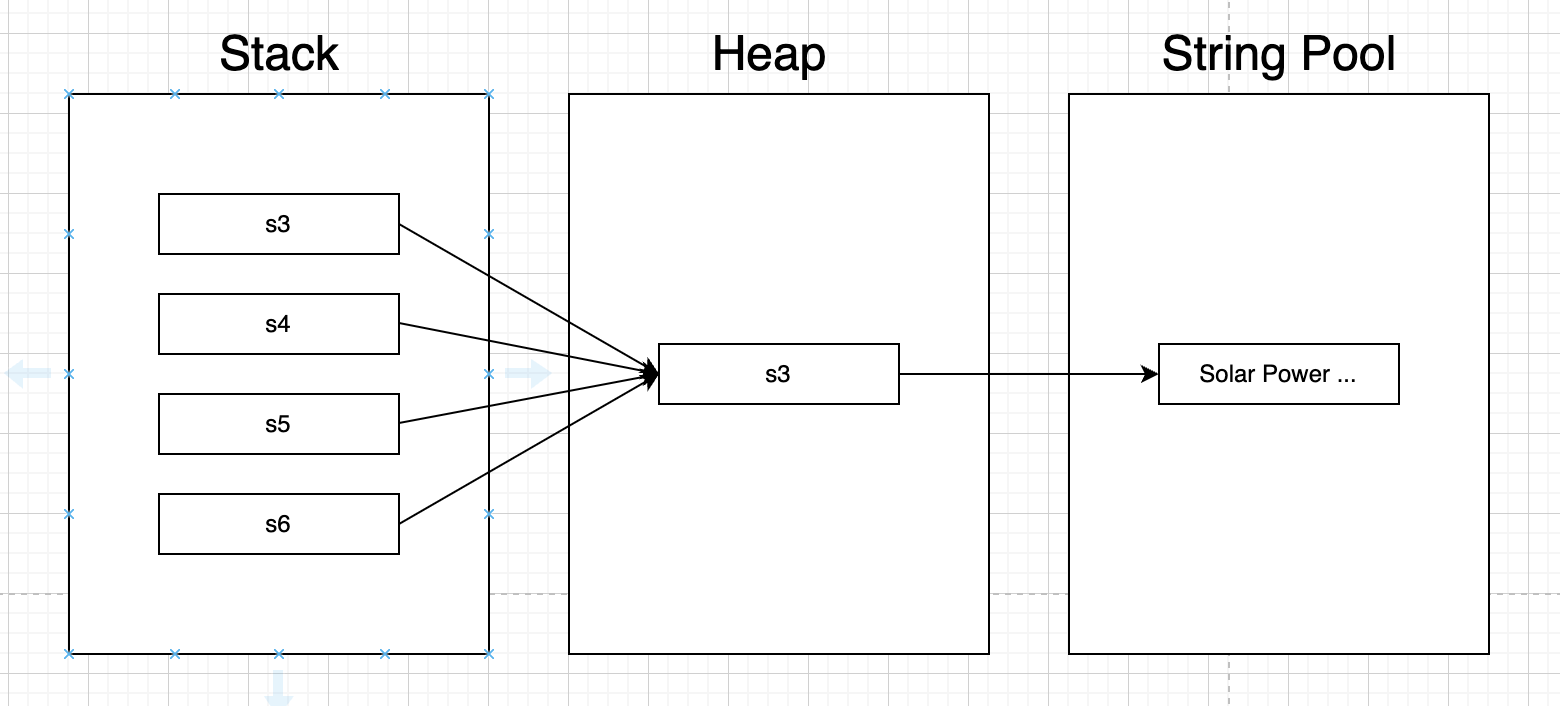
However, once we change the value of the string, we automatically point at different memory addresses because strings are immutable. Python assigns a new memory address to each new string.

IsUpper Python Function (Equivalent to Java isUpperCase)
If I haven’t already said it enough times, I come from a Java background. It may not be immediately obvious, but the Python isupper function is the same as the Java isUpperCase function. It returns a boolean value that reports on whether or not the passed string is all upper case.
Let’s see the function in action below. Once again, we have to do some string slicing in Python to get some different strings. We could just pass it the strings that we have already seen but that would be boring, so let’s take a look at some different strings.
# Python isupper function
print(f"{s3} is upper case? {s3.isupper()}")
print(f"{s3[:4]} is upper case? {s3[:4].isupper()}")
print(f"{s3[:1]} is upper case? {s3[:1].isupper()}")
print(f"{s3[:-2]} is upper case? {s3[:-2].isupper()}")
print(f"{s3[6]} is upper case? {s3[6].isupper()}")
The above code results in an output like the one below. Note that the Python isupper function returns True if and only iff the entire string passed in is upper case.

IsLower Python Function (Equivalent to Java isLowerCase)
Logically, the islower Python function works the exact same way as the isupper function, just the other way around. Instead of detecting if an entire string is upper case, it detects if an entire string is lowercase. We use some different slices here, but the concept is the same.
Once again, we take 5 substrings of one of the strings we created earlier. This time, we run the islower function on them.
# Python islower function
print(f"{s3} is lower case? {s3.islower()}")
print(f"{s3[:4]} is lower case? {s3[:4].islower()}")
print(f"{s3[1:4]} is lower case? {s3[1:4].islower()}")
print(f"{s3[:-16]} is lower case? {s3[:-16].islower()}")
print(f"{s3[8]} is lower case? {s3[8].islower()}")
The code above produces an output similar to the image below. Notice that in both cases for islower and isupper, a one character string is recognized.

Python Lower vs Casefold Function for Comparing Strings
Python has two functions that convert all the characters in your string to lowercase alphanumerics. First we have the classic lower function, which turns all the characters into lowercase characters. Second we have casefold which does the same thing as lower but more “aggressively”.
The difference is in which conditions you want to use the function. If you are looking to just convert a string to lowercase, use lower. The caveat here is the lower pretty much operates only on ASCII values. There are only 128 ASCII characters.
Meanwhile, if we want to work with the 144,697 Unicode characters, it’s suggested to use the Python casefold function. CaseFold is meant to compare strings irrespective of case. Unlike lower, casefold is not about turning a string into lowercase. It is meant to compare strings that come in from different cases.
# Python casefold vs lower
s3 += "ẞ"
print(s3.casefold())
print(s3.lower())
The code above shows the difference between the Python casefold and lower functions. See how casefold folds the German orthographic Eszett (ẞ) into an “ss”. Meanwhile, the Python lower function doesn’t change it. This is a primary example of the difference between Python casefold and lower.

Check if a String is Alphanumeric with the isAlNum Python Function
The last few functions we looked at, isupper, islower, lower, and casefold all revolve around letter casing. In this section, we’re going to look at both letters and numbers. The isalnum function checks if a string is made up of entirely alphanumerics.
In the code below, we check four different strings with isalnum.
# check for alphanumeric with isalnum
print(f"Is {s3} alphanumeric? {s3.isalnum()}")
print(f"Is {s1} alphanumeric? {s1.isalnum()}")
print(f"Is {s5} alphanumeric? {s5.isalnum()}")
print(f"Is {s3[:3]} alphanumeric? {s3[:3].isalnum()}")
Did you think that s1 (“Solar Power”) was going to be True for isalnum? When I first started, I totally did. However, the string has a space in it! That means that it evaluates to False. The first three characters, “Sol”, is the only string we tested that evaluates to true for isalnum.
Summary of Python String Manipulation
What a gauntlet. You probably won’t remember everything that you learned here in just one go round. Maybe bookmark the page for review so you don’t lose it :). In this post we covered a ton of different string manipulation techniques.
We started from converting a Python string to bytes. There’s a difference between strings and byte strings in Python 3 as opposed to in Python 2. It’s important to know this or you may run into type errors. However, I wouldn’t be surprised if you never touch Python 2 again, it’s 2022 and Python 2 isn’t even officially supported anymore.
Next, we looked at ljust. This Python string function left justifies your string with a customer character. If you don’t pass a custom character, you get spaces as a default. After ljust, we looked at how to do string indexing. Being someone with a Java background, I refer to this as the Python charat equivalent.
In Python, string indexing is as simple as using brackets. Beyond that, Python also allows for negative indices. You can slice your strings forwards and backwards. After our brief foray into Python string slicing, we looked at copying.
There are multiple ways to handle copying in Python. We looked at 3 ways to copy a string. First, a direct = assignation, then the copy and deepcopy implementations. For immutables like strings, we see almost no difference in behavior. A further piece on lists will cover more differences.
Finally, we moved on to letter casing with isupper, islower, lower, and casefold. I want to mention here that upper is also a function, it does exactly what you think it does, it sets all the letters to uppercase. The last thing we did was check to see if a string was fully alphanumeric using Python’s isalnum function.
More by the Author
- Keras Optimizers in Tensorflow + Common Errors
- List within List Python
- Build an AI Text Summarizer
- Send API Requests Async in Python
- Build an RNN with Gated Recurrence Units in Keras
I run this site to help you and others like you find cool projects and practice software skills. If this is helpful for you and you enjoy your ad free site, please help fund this site by donating below! If you can’t donate right now, please think of us next time.

2 thoughts on “A Complete Guide to Python String Manipulation”